
There are various settings that can be configured within the app.
To access these, and customise the app to your personal preferences, open the side menu and click Settings.


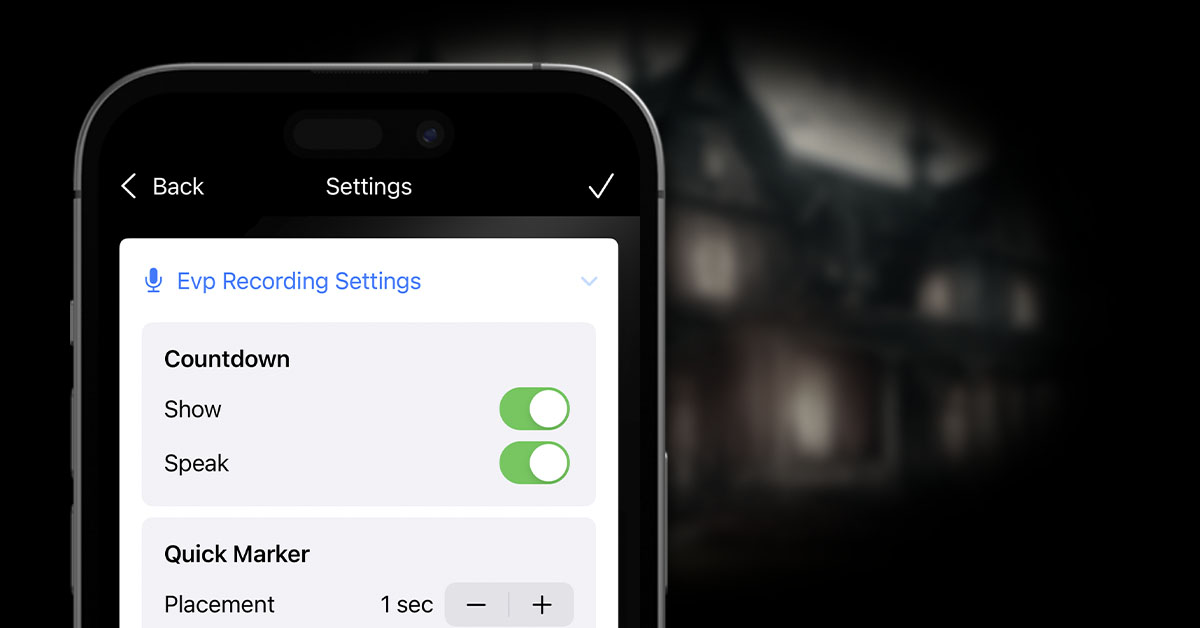
EVP Recording Settings
Here you can configure settings for recording audio / EVP.
Countdown
Show (enabled by default): Show a countdown from 3 to 1 prior to beginning your recording, to give a clear indication of when it is safe to start talking without audio being accidentally cut off.
Speak (enabled by default): If this option is enabled, the countdown is also spoken out-loud. This means that you will be able to hear on the recording when the countdown has concluded.
Quick Marker
Placement: When creating a quick marker against an audio recording, this setting determines when the marker be created, prior to the time at which the button is pressed. For example, a setting of 1 will add the quick marker 1 second before the button was pressed. This means that it’s more likely to precede the actual audio item you want to mark, particularly useful during live recording.
Video Recording Settings
Here you can configure settings for recording video.
Countdown
Show (enabled by default): Show a countdown from 3 to 1 prior to beginning your recording, to give a clear indication of when it is safe to start talking without audio being accidentally cut off.
Speak (enabled by default): If this option is enabled, the countdown is also spoken out-loud. This means that you will be able to hear on the recording when the countdown has concluded.
EMF Settings
Here you can configure settings for recording EMF.
Audio Countdown
These settings only apply when recording an EMF session including audio.
Show (enabled by default): Show a countdown from 3 to 1 prior to beginning your recording, to give a clear indication of when it is safe to start talking without audio being accidentally cut off.
Speak (enabled by default): If this option is enabled, the countdown is also spoken out-loud. This means that you will be able to hear on the recording when the countdown has concluded.
Temperature
Here you can configure settings for recording Temperature.
Default Units
Specify whether you prefer for your temperature recordings to be measured in °C or °F. This can be changed on a recording-by-recording basis, but to enable comparison within an investigation, the unit should remain consistent throughout.
Report Settings
Here you can configure settings for Report production.
General
Include Location Details (enabled by default): When this setting is enabled, a summary section is produced for any Locations within the report which have a basic description provided against them.
Include Evidence Comments (enabled by default): With this setting enabled, any comments recording against individual pieces of evidence / media item will be included within the report.
Evidence Types
The individual evidence types all have their own settings.
Comment/Update
(Enabled by default). When this setting is enabled, general comments / observations recorded against the investigation separate to other evidence types will be included in the report.
EMF
(Enabled by default). When this setting is enabled, any EMF evidence recorded will be included within the report.
Temperature
(Enabled by default). When this setting is enabled, any Temperature evidence recorded will be included within the report.
EVP
Include (enabled by default): When this setting is enabled, Audio / EVP evidence recorded will be included within the report.
Favourites Only (enabled by default): When this setting is enabled, only audio media items that have been marked as favourites will be included within the report. This is to save space within the document by only including those pieces of evidence that you have deemed to be particularly note-worthy.
Photos
Include (enabled by default): When this setting is enabled, Photos recorded will be included within the report.
Favourites Only (enabled by default): When this setting is enabled, only photos that have been marked as favourites will be included within the report. This is to save space within the document by only including those pieces of evidence that you have deemed to be particularly note-worthy.
Videos
Include (enabled by default): When this setting is enabled, Videos recorded will be included within the report.
Favourites Only (enabled by default): When this setting is enabled, only video media items that have been marked as favourites will be included within the report. This is to save space within the document by only including those pieces of evidence that you have deemed to be particularly note-worthy.