
Audio recordings (usually used for conducting EVP sessions, or recording unusual sounds) can be used as an evidence type for your investigation.
To add an audio recording, you first need to open your investigation, click the + button to show the evidence menu and select the EVP Session option.
The EVP screen will appear. Here, you can record your audio, as well as setting the evidence location from the location picker at the top of the screen.
Recording Audio
To record audio using your phone’s microphone, click the + icon and select Microphone. You may at this point be prompted to grant access to the microphone. You must grant access to be able to record audio.

Recording Controls
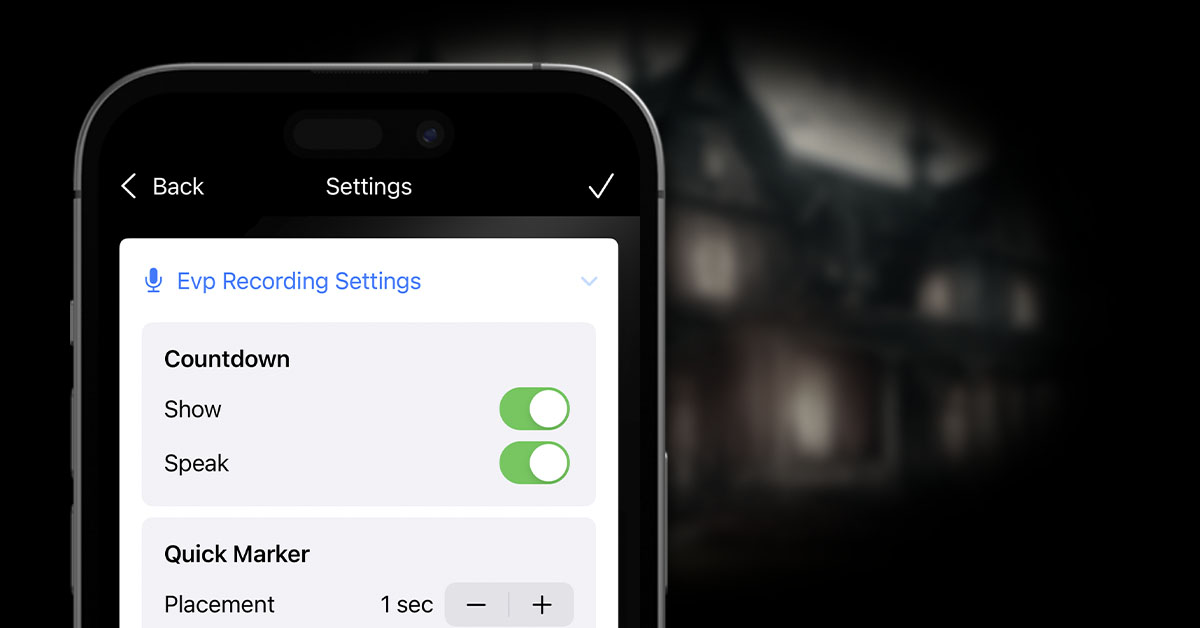
To begin recording press the large round record button. If the EVP Countdown is active in the Settings, you will see the countdown counting down from 3 to 1 (click the settings cog icon in the top right-hand corner of the screen to change settings).
Whilst recording, you can quickly add a marker to the recording by clicking the bookmark shaped icon beside the record button. This will quickly place a marker which can later be edited, allowing quick and easy review. If you hold down the marker button, you will be prompted to enter a description of the marker there and then. This may be useful for remembering what you are marking, but could hinder being able to pay attention to the ongoing investigation, so we would recommend adding quick markers where necessary, then reviewing later.
Any recordings you make during this session will appear in the roll at the bottom of the screen.
You can click on a recording in the roll to listen back, delete, comment, favourite or share it.
If you would like to keep the recordings you have made, click the tick button to store them against the evidence. If you decide to discard them, click the x icon.
Adding Existing Recordings
New in v1.1
You can also add existing recordings stored on your phone, or in iCloud, directly from the EVP screen.
To do so, tap the + icon, and select Import File.
This will open your Files app and allow you to select one or more audio files (mp3 and wav format only). Once you have selected the files, tap Open. This will import the files into your EVP session, ready to be played back and used as per other recordings.
Reviewing Recordings
Recordings can be reviewed within the evidence item, or from the audio roll while still within the session. However they are accessed, all of the features remain the same.
Click a recording in the timeline preview of the evidence to open that specific recording directly, or click the evidence header to view the sheet full of recordings, then click on the recording you are interested in.
The recording playback screen will appear. You will get slightly different views, depending on which way around you are holding your screen.

Common Features
Both portrait and landscape view have some features in common.
These include playback features, such as play/pause, go to start, go to end, rewind by 5 seconds and fast-forward by 5 seconds.
You can also see a visual representation of the recording, though in different ways, one of which you might find more useful than the other.
You can scrub along the duration of the track using the slider, to move around to wherever you want to within the recording.
You can also add Quick Markers from both orientations by clicking on the appropriate button.
Portrait View
With your phone held in portrait view, you have access to more playback features.
From here, you can speed up or slow down playback, and also adjust the playback volume, using the controls on the screen.
You can also create a marker, including a full comment against it.
From this view, you can also access a list of all of the markers associated with the recording. Click on the bookmark icon at the top of the screen to switch from the audio representation to the markers list.

Pressing quickly on one of the markers will move the playback to position of the markers.
Long-pressing on a marker in the list will give you the option of deleting or editing the marker.
Comments
Comments can be added against an individual recording, or against the evidence session as a whole.
Evidence Comments
To add comments against the evidence, click the Comments button at the bottom of the Recordings sheet (i.e. not the playback screen of an individual recording). Any existing comments will be displayed, plus an area where a new comment can be added.

You can delete a comment by long-pressing on the individual comment and then selecting the Delete option.
Recording Comments
Similar to the evidence comments, each individual recording can have comments against it. Whilst in the playback screen for a recording, click the Comments button at the bottom of the screen. This works exactly the same as the above.
Favourites
Favourites are used to determine which recordings should be exported within the investigation report. They also make it easier to find your favourite recordings while browsing evidence.
There are two ways of marking a recording as a favourite:
Individual recording thumbnail: From the main audio evidence screen, where the thumbnails are displayed, long-press the thumbnail of the recording you want to favourite and select the Favourite option.
While in playback for a recording: Click on the Favourite button at the bottom of the screen.
To un-favourite a recording, just perform one of the above actions again.
Deleting Recordings
There are a few ways of deleting recordings.
Individual recording thumbnail: From the main audio evidence screen, where the thumbnails are displayed, long-press the thumbnail of the recording you want to delete and select the Delete option.
While in playback for a recording: Click on the ellipsis menu in the top right-hand corner of the screen and select the Delete Recording option.
Multiple recordings: From the thumbnail display, click the Select option at the top of the screen. Select all of the recordings you want to delete, and click the trash can icon at the bottom of the screen to delete all of the selected recordings at the same time.

Sharing Recordings
There are a few places from which recordings can be shared.
Individual recording thumbnail: From the main audio evidence screen, where the thumbnails are displayed, long-press the thumbnail of the recording you want to delete and select the Share option.
While in playback for a recording: Click the Share button at the bottom of the screen.
Multiple recordings: From the thumbnail display, click the Select option at the top of the screen. Select all of the recordings you want to share, and click the share icon at the bottom of the screen to share all of the selected recordings at the same time.
The timeline: to share all of the recordings within a specific piece of evidence, the quickest way is through the timeline. Click the Share button at the bottom of the evidence item in the main investigation timeline to share all of the recordings within that evidence.
Moving Recordings to Different Evidence
There may be times when you have added recordings to one piece of evidence but need to move it to another. For example, if you have continued taking recordings under the wrong location.
Recordings can be moved either to another existing piece of evidence or a brand new entry.
To do this, click the Select option at the top of the screen. Select all of the recordings you want to move, and click the move icon (the folder).
Any existing audio sessions will be displayed, along with the option to create a new session with the selected recordings. Choose where you want to move the selected recordings to and click Move. If you have selected the New option, you can also optionally select a location for the new session.